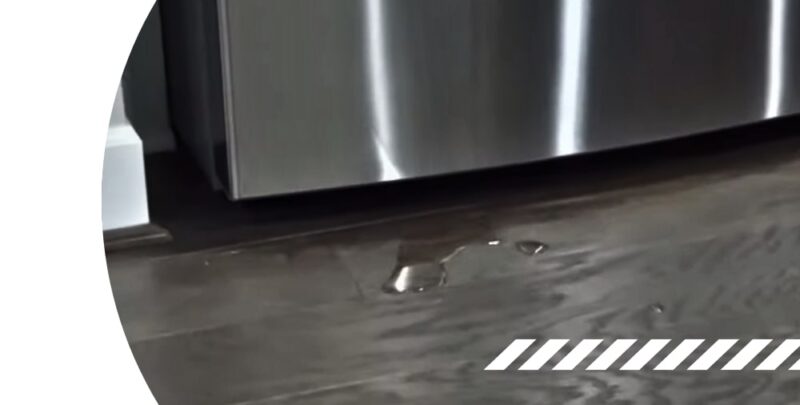
A leak in your refrigerator’s glass door can be a frustrating and potentially costly problem. Not only can it cause water damage to your floors and surrounding areas, but it can also compromise the temperature and efficiency of your appliance. Fortunately, fixing a leak in your refrigerator’s glass door is often a simple and straightforward process that can be done with a few basic tools and some know-how. In this article, we’ll guide you through the steps to identify the source of the leak, repair the problem, and prevent it from happening again in the future.
Identifying the Problem
In order to fix a leak in your refrigerator glass door, it is important to first identify where the leak is coming from. Is it coming from the frame of the door, the gasket, or the hinges?
If you don’t know, it is important to inspect your refrigerator glass door and identify the source of the leak. Once you have located the source of the leak, you can then proceed to fix the problem.
Check the door seal
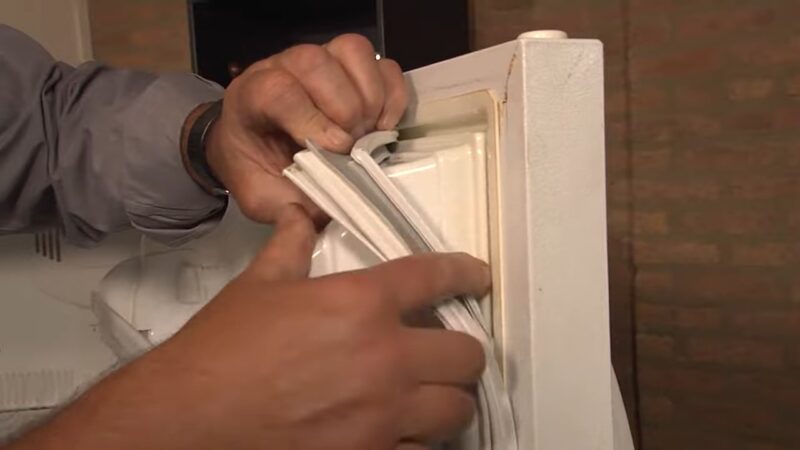
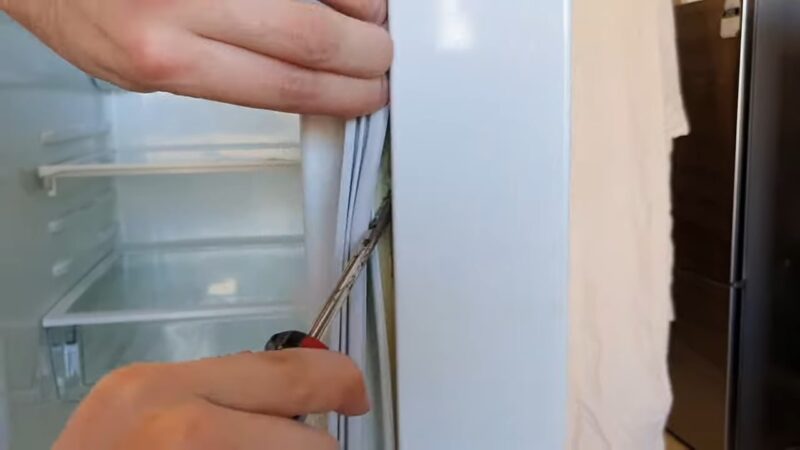
The door seal is the most important factor for keeping cold air in and preventing water from leaking out. An airtight seal will also help keep food fresher for longer periods of time. To inspect the door seal, open and close the refrigerator door several times and pay close attention to where the two surfaces meet. If you notice any gaps, tears, or discoloration on the seal, it should be replaced right away.
When buying a new door seal, be sure to measure both sides of the doors so you get one that fits properly. Mark off any measurements with a pen or marker and check to make sure they’re accurate before ordering your part. Don’t forget to measure twice!
Removing the old door seal may require removing some of the screws in order to access the back of it. You should then pull off the old gasket with your hands or use a pair of pliers or a flat-head screwdriver if necessary. Be careful not to damage other parts as you remove them from your refrigerator door!
Ensuring all of your parts align when replacing your new refrigerator gasket also ensures an airtight fit when you shut your appliance doors — this is important, as poor alignment can lead to reduced energy efficiency and higher energy bills in addition to leaking water! Additionally, it prevents bacteria buildup and keeps unpleasant odors at bay which preserves food freshness more effectively than if the product released trapped moisture nonstop. With proper installation and regular maintenance, a new gasket should last up to 10 years before needing replacement again!
Check the door gasket
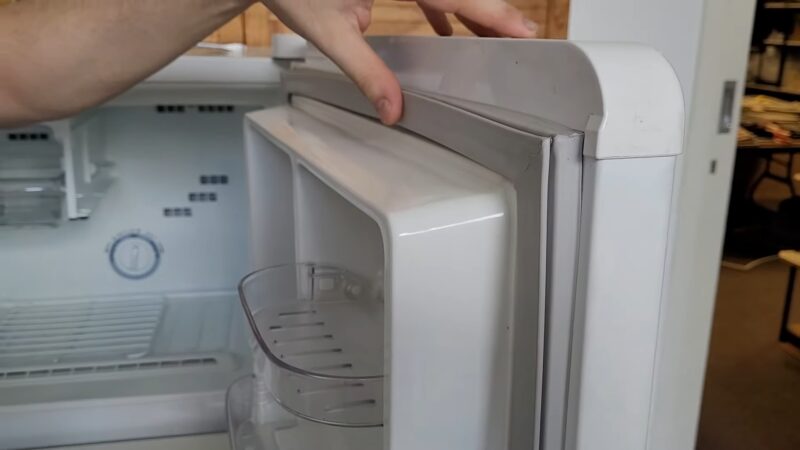
The door gasket is a thick rubber seal that helps keep cold air inside your refrigerator and warm air outside by creating an air-tight barrier. If this gasket is cracked, torn, or not sealed correctly, it could be causing the leak.
To check the gasket, inspect it carefully to look for any cracks or tears. Make sure it is making an unbroken seal around the entire door and that there are no gaps where warm air can get through. You can clean off any dirt or debris if needed using a mild soap and water solution or a mild abrasive cleanser like baking soda.
If you find any damage, you will need to have it replaced with a new sealing gasket to fix the leak. Contact a professional for assistance if needed.
Check the door hinges
Verify that the door hinges are secure. To do this, open the refrigerator door and firmly grasp each hinge one at a time. Pull each hinge toward you while pushing in on the refrigerator door at the same time. This pressure should slightly lift the top of the door away from where it meets with the bottom; if so, your hinges are working properly. If they aren’t tight, level, and secure, then unscrew them and re-tighten them as necessary before moving on to check other parts of your refrigerator.
Inspect the door seal that runs around your glass refrigerator doors. Look for tears or cracks in any part of it; if this is your problem you should replace it soon as most seals don’t last longer than five years without becoming hardened or brittle. Check for any bulges or tears in this seal, which can cause cold air to escape from the fridge, leading to moisture forming on glass surfaces inside your appliance — and potentially water leaking out through those tears or cracks when you open or close it.
If you find that neither issue appears to be causing your leaky refrigerator door, move on to examining its handle assembly for any signs of damage such as broken screws or misalignment with its latch plate hole in order to fix a leak in my refrigerator glass door properly.
Tools and Materials
In order to fix a refrigerator glass door leak, you will need a few tools and materials. These include a screwdriver, a refrigerator door seal replacement kit, silicone caulk, and a caulking gun. It is important to have all of these items on hand before beginning the repair process.
Now, let’s go through the steps of fixing the leak.
Determine what kind of sealant is needed
Depending on the model, refrigerator door gaskets may be made from metal, polyurethane foam, or vinyl. Therefore, it is important to check along the entire seal for any broken areas and determine what kind of material you will need for repair.
- Metal: Gaskets made from metal tend to be wired or steel strips covered by a sheath or layer of plastic or rubber. Metal gasket materials are usually composed of stainless steel cladding combined with an extruded foam and sometimes contain an anti-microbial element that helps protect food from spoilage.
- Polyurethane Foam: Polyurethane foam seals are often used in combination with rubber seals along the edges of the refrigerator door. This kind of sealant is also known as “weather stripping” because it prevents warm air from entering gaps between the inner and outer lids of your fridge door. The flexible nature of this material makes it effective on large surfaces and can easily overlap large cracks that are more than a quarter inch wide.
- Vinyl: Vinyl is one of the most common gasket materials for sealing a glass refrigerator door because its durable construction allows it to form snugly around door frames or on drain tube openings inside fridges.
Gather the necessary tools and materials
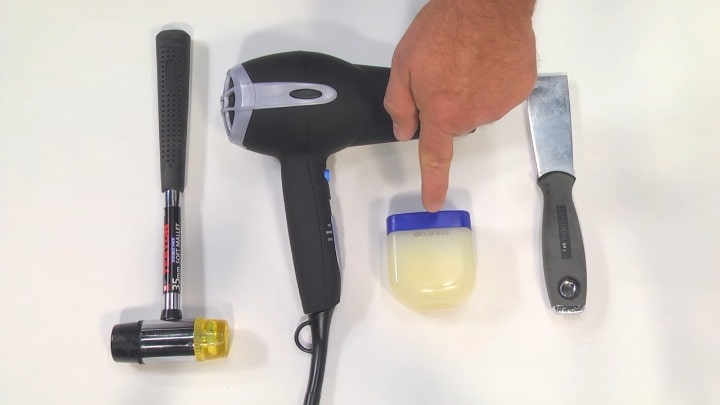
For fixing a leak in the refrigerator glass door, you will need a few specific tools and supplies. To fix your glass door and prevent future leaks, be sure you have the following on hand:
Tools
- Screwdriver
- Pliers
- Utility knife
- Vacuum cleaner
- Caulk gun
- Hammer (optional)
Materials
- Dry cloth or rag
- Caulk or sealant (silicon-based for best results)
- Replacement gaskets, if necessary
Once you’ve gathered all your needed materials and tools, you can proceed with fixing your refrigerator glass door leak. Carefully follow the provided instructions, taking extra caution while working with sharp objects such as utility knives. Move slowly and methodically as this type of repair requires precise skills. Keep all pieces clean while working to ensure the best results when reassembled.
Preparing the Area
Make sure to lock the refrigerator and turn off the power source to the appliance at the wall. Then clear the surrounding area of any items that may get in the way.
Prepare all the necessary materials, such as any sealant, putty knife, or other supplies you may need for the repair. Once you have everything you need and the area is prepped, you can start the repair.
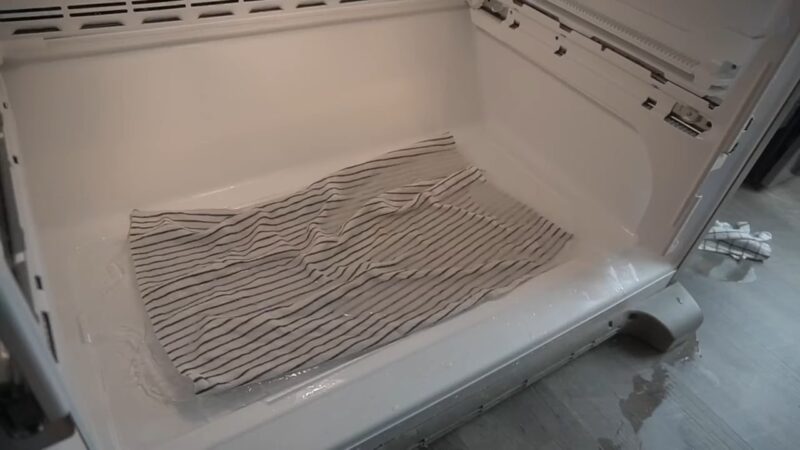
Clean the area around the leak
It is important to make sure the area around the leak is clean and free of debris. Depending on your appliance model, you may need to remove the shelves or drawers inside the refrigerator door to gain access to the leaking seal.
Use a recommended appliance cleaner or gentle soap and a clean cloth to wipe away any dust, dirt, and other buildups around the opening of the leaking seal. Be careful not to use an abrasive cleaner as this could damage your refrigerator’s finish.
If necessary, use thin needle nose pliers or tweezers to remove lint or small debris that may be obstructing access to the sealed area without damaging anything else. This will help ensure that you can easily see and access everything you need once you start working on it.
Prepare the area for the sealant
Start by mixing up a solution of 50/50 warm water and white vinegar or detergent in a bowl. Dip a piece of cloth or sponge into the solution and clean down the entire area, especially around any imperfections, until all dirt and debris is removed.
Next, apply masking tape to either side of the affected area in order to avoid splattering onto other parts of the refrigerator door. Alternatively, you could use painter’s tape for easier removal once the work is complete. When you have finished taping up, use your cleaning solution one more time in order to get everything extra clean before proceeding with the sealant application.
Applying the Sealant
All refrigerator doors have a sealant around them to help prevent cold air from leaking out. If you have a leaking glass door on your refrigerator, it needs to be fixed quickly to make sure the cold air is properly retained.
One of the best ways to repair the seal around your refrigerator door is to apply a sealant. Let’s learn more about applying the sealant so you can fix your leaking glass door.
Apply the sealant to the area
For this project, it is best to use a durable, food-grade sealant specifically made for refrigerator and freezer door repairs. Before applying the sealant, proper preparation is essential. First, clean the affected area with a mild soap solution and a lint-free cloth. The area should be completely dry before going any further.
Next, the area needs to be primed before the sealant can be applied. Primers help ensure that your sealant will adhere properly to the surface of the refrigerator glass door. Place an even layer of primer on your applicator and spread it over the surface of the repair area in full coats (letting dry between each one). Once dry, inspect it for any missed areas or bubbles that need to be addressed.
Now you’re ready to actually apply the sealant! Begin applying your sealant from near the inside edge of your leaky glass refrigerator door repair — working outward — for best results. It’s important to move slowly when spreading your sealant – you don’t want it overflowing from one side or another! When you’ve finished covering your entire repair area with a thin layer of sealant allow additional air circulation around it so that ventilation can help aid in the drying process. Let sit until fully cured before using normally again – this can take 16-24 hours!
Allow the sealant to cure
Once the sealant is applied, you will need to patiently wait before attempting to use your refrigerator. The time required for the sealant to fully cure will depend on the type of sealant and any instructions provided by the manufacturer. A minimum of 24-48 hours is recommended as a general rule.
During this curing period, it is important that you do not disturb or move the sealed area until it is completely dry and cured. Once this is done, your sealant should form a durable barrier against any further leaking from your refrigerator glass door.
Finishing Up
You will need to replace the door gasket and check the door alignment. It is important to use the right tools and follow the instructions carefully in order to fix the issue completely.
Let’s look at different steps for finishing up the repair.
Check the area for any remaining leaks
Make sure that all of the screws and bolts used in the repair process have been securely tightened. Turn on your refrigerator and wait for a few minutes to see where any potential water is coming from. Go ahead and give the edges of the door a quick wipe-down to make sure that no water is leaking from anywhere on the exterior of your door.
If you find any spots or drips, try tightening up screws or applying more tape, or caulking around any affected areas. Once you are satisfied with no remaining signs of a leak, turn off your refrigerator again before beginning any cleanup process.
Clean up any excess sealant
Using a wet paper towel, wipe away any excess sealant that is visible on the interior or exterior of the refrigerator. It is important to ensure that all of the excess sealants have been removed to ensure a tight and leak-proof fit for your refrigeration door.
After this step has been completed, your refrigerator should be leak-free! In order to avoid another call from a repairman in the future, make sure to inspect your refrigerator’s seals regularly and replace them as needed when they become damaged or worn out. Regular inspection and maintenance of refrigerator seals prevent unnecessary repairs and water damage caused by leaking refrigerators.
Reassemble the refrigerator door
Once the new part has been installed, it is time to reassemble the pieces. Start by applying a new layer of gasket grease around the perimeter of the door and any plastic liner parts that need lubrication. Then, carefully install each part in the reverse order of how it was taken apart, making sure all screws, washers, and springs are in their proper place and properly secured. Finally, close and latch the door to test for proper seal and adjust as necessary.
After reassembling your refrigerator door, remember to let any newly replaced gaskets settle before closing the door fully or your repair could be in vain. To speed up this process you can use a hair dryer or warm towel to help seat the gasket evenly around its edges. But whatever you do make sure there’s no remaining moisture at all around the edges of your refrigerator door before closing it again — otherwise you may have just done yourself more harm than good!
If you’ve recently painted your kitchen and noticed a leak in your refrigerator glass door, you may be wondering how long it takes for paint to dry before attempting to fix the issue. Fortunately, there are some general guidelines you can follow to ensure that your paint is dry enough to make the necessary repairs.
FAQs
How do I identify the source of the leak in my refrigerator’s glass door?
Start by examining the door gasket for signs of damage or wear, and check the drain line for any blockages. If the issue is not immediately apparent, you may need to consult a professional technician.
How do I replace the door gasket on my refrigerator?
To replace the door gasket, start by removing the old gasket and cleaning the door surface. Then, position the new gasket and use a screwdriver to secure it in place.
Can I clean the drain line myself?
Yes, you can clean the drain line by using a mixture of hot water and mild detergent or vinegar. Pour the solution down the drain line and use a pipe cleaner or similar tool to remove any blockages.
How do I know if my refrigerator’s drain line is clogged?
If you notice water pooling inside the fridge or around the base of the appliance, it may be a sign that the drain line is clogged.
Can I prevent a leak in my refrigerator’s glass door from happening again?
Yes, regular maintenance and cleaning of your fridge can help prevent leaks and prolong the lifespan of your appliance. Check the door gasket and drain line periodically, and clean the interior of the refrigerator regularly.
How often should I replace the door gasket on my refrigerator?
The frequency with which you should replace the door gasket will depend on how often you use it and the quality of the gasket. In general, it is a good idea to replace the gasket every few years or if you notice signs of wear or damage.
Can a leak in my refrigerator’s glass door cause damage to the appliance?
Yes, if left unchecked, a leak can lead to water damage and potentially compromise the performance and efficiency of the appliance.
Can I repair a crack in my refrigerator’s glass door?
In most cases, a cracked glass door will require a replacement door. Consult with a professional technician for advice on the best course of action.
Should I attempt to repair my refrigerator’s glass door myself, or hire a professional?
If you are comfortable with basic repairs and have the necessary tools and knowledge, you may be able to fix a leak in your refrigerator’s glass door yourself. However, if you are unsure or uncomfortable with the repair process, or if the issue is more complex, it may be best to consult with a professional technician. They will have the expertise and specialized tools needed to properly diagnose and repair the problem, ensuring its safety and long-term performance.
Conclusion
In conclusion, fixing a leak in your refrigerator’s glass door may seem daunting, but with the right tools and approach, it can be a simple and manageable task. By following the steps outlined in this article, you can identify the cause of the leak and repair the problem, ensuring that your appliance operates at optimal performance and efficiency. Remember to take the necessary precautions, such as unplugging the refrigerator and wearing protective gear, to stay safe during the repair process. With these tips and techniques, you can fix a leak in your refrigerator’s glass door and avoid the potential for costly water damage and energy loss.